Showing posts with label Urban Decay. Show all posts

Friday, 4 April 2014

Caligraphy FOTD

I've been seriously hating my skin recently.  That crater on my face?  Yeah, that was a black head.  Ewww.  Totally at a loss as to how to fix it though.

I picked up the Calligraphy palette a couple of years ago in the sale, and it's not one that I reach for often.  I think the blue liner makes this look way more interesting.


Face
Maybelline Baby Skin primer
YSL Touche Eclat foundation BR10
Illamasqua Skin Base Lift White and Light 1
Urban Decay Naked Skin Ultra Definition Loose Finishing Powder Light
Benefit Dandelion blush

Eyes
NARS smudge proof eyeshadow base
NYX jumbo pencil in Milk
Guerlain Calligraphy palette
Urban Decay 24/7 pencils in Scorch and Sabbath
Lancome Hypnose Star mascara
MUFE Aqua Brow

Lips
Guerlain Rouge G L'Extrait in Colire

Sunday, 26 January 2014

Aquarius FOTD

So I didn't make it through a whole month without buying makeup.  Almost as soon as I started to rejoice at my skin clearing up, it went all red and blotchy and I got lots of little spots.  I know it's because I'm really ill at the moment, but it got to me.  Whilst in Boots I spotted Maybelline Baby Skin primer, which every one has been raving about, and Maybelline Dream Pure BB Cream for oily skin.  As my YSL foundation has run out I thought I'd give them a go.  They seem like they're doing the job at the moment, but I always like to wear new face stuff for a week or so before passing judgement. 

Anyways, next up in Sephora's star sign inspired face chart collection is Aquarius.   I used the product list as a guide line, choosing to use the chart rather than the instructions.  This one is far more interesting that the Capricorn face chart!


After having a massive fallout with the phone on my camera, I decided to dig out my proper camera.  It's a bit old, but the quality is pretty good.  Though for some reason my eyebrows look almost wet in the close ups.  I can promise that they don't look like that in real life!  Also, photographing glitter seems impossible for me.  I wish that you could see how pretty Illamasqua pigment in Beguile really looks.


Face
Maybelline Baby Skin primer
Maybelline Dream Pure BB Cream in Light
Illamasqua Skin Base Lift in White and Light 1
MAC Mineralize Skin Finish Natural in Light
MAC Alpha Girl Beauty Powder Blush
Benefit High Beam

Eyes
NARS Smudge Proof Eyeshadow Base
NYX Jumbo Pencil in Milk
Sugarpill Tako eyeshadow
MAC eyeshadows in Cool Heat, Submarine, and Contrast
Urban Decay Blackout eyeshadow
Illamasqua Pure Pigment in Beguile 
MAC Fix+ (sprayed on lid before applying Beguile)
Urban Decay 24/7 pencil in Perversion
Lancome Hypnose Star mascara
MUFE Aqua Brow

Lips
Sephora lipstick No.28

Monday, 20 January 2014

Pin-up FOTD

Standard pin-up look today.  I was going to add false lashes, but then I managed to burn myself on my curling wand.  Didn't really fancy trying to add lashes with a finger and thumb all bandaged up.  Doing the liner was hard enough!  And it feels good to finally be able to ditch the liquid foundation again.


Face
Illamasqua Skin Base Lift in White and Light 1
MAC Mineralize Skin Finish Natural Light
MAC Sculpt powder
Benefit Dandelion
MAC Mineralize Skin Finish in Lightscapade

Eyes
NARS Smudgeproof Eyeshadow Base
Urban Decay Theodora palette
Rimmel Glam Eyes black liquid liner
Illamasqua Vow pencil
Lancome Hypnose Star mascara
MUFE Aqua Brow

Lips
Guerlain Rouge G in Garconne

Saturday, 18 January 2014

Pink and Copper FOTD

I've been favouring softer looks lately.  The only way I ever seem to use MAC Mineralize Shadows is as liners.  I just don't get along with them as eyeshadows.


Face
Illamasqua Skin Base Foundaion 02 and 06 mixed
Illamasqua Skin Base Lift concealer white and light 01
MAC Mineralize Skin Finish Light
Benefit Dandelion blush

Eyes
NARS Smudge Proof Eyeshadow Base
NYX Jumbo Pencil in Milk
Urban Decay eyeshadows in Magic (Glinda palette) and Trick (Naked 3)
Bobbi Brown Sparkle eyeshadow in Silver Lilac
MAC eyeshadows in Amber Lights and Beauty Marked
Boots Natural Collection eyeshadow in Soft Pink
MAC Mineralize eyeshadow in Young Punk
   mixed with
Illamasqua Sealing Gel
Urban Decay 24/7 pencils in Empire and Scorch
Lancome Hypnose Star mascara

Lips
MAC lipstick in Of Royalty
Chanel Levres Scintillantes Glossimer in Aragonite

Tuesday, 14 January 2014

Dramatic Aarbic inspired look

For those of us with rounder eyes, Arabic inspired makeup can be difficult to do.  Usually when you wing out your liner, you follow the natural curve of your eye.  This means that you don't get that long, drawn out cats eye shape.  This is a tutorial which shows how the effect can be achieved.


Products Used
NARS Eyeshadow Primer
NYX Jumbo Pencil in Milk (matte white)
Sleek Vintage Romance palette (medium purple, dark purple, gold, and black)
MAC Nylon eyeshadow (white-gold)
Illamasqua black gel eyeliner
Urban Decay 24/7 pencil in Zero (black)
Lancome Hypnose Star mascara
Girls With Attitude False Lashes - Diva

The red line in the first picture shows where my wing would usually go.  As you can see, it follows my lower lash line, and goes up in quite a steep line.  For this look I'm going to be ignoring that line, instead placing it on the angle shown by the blue line. This line starts about a quarter of the way along the lash line, and only slopes up slightly.  This line is the key to getting this look right!

1.  After priming my eye with an eyeshadow base and NYX Milk, I placed a piece of tape where I want the wing to go.  Draw in your crease line, using the tape as a guide line.  I drew my crease line a little above where my natural crease lies, giving myself more lid space.  Blend out the black liner with a tapered blending brush.

2.  I like to remove the tape, as I feel it gets in my way, but if you prefer you can leave it on until step 8.  With a flat shadow brush, pat gold eyeshadow over the lid, all the way up to your black crease line.

3.  Taking the tapered blending brush. apply the bright purple shadow in the crease area, over the black pencil.

4.  Pat the white-gold highlight colour along the brow bone, and at the inner corner of the eye.  With a clean tapered blending brush, blend the purple and the white-gold.

5.  Take a small angled brush and define the crease line with a dark purple shadow.  I use the side of the angled brush to gently blend the dark purple up into the lighter purple.

6.  Next, using your flat shadow brush, pat black shadow along the wing, blending it into the lid colour at the same angle.  Alternate between black and gold until you're happy with the blending.

7.  If you haven't yet taken the tape off, now is the time to do so.  Clean up any fallout you may have.  I also run a line of concealer along the wing.
8.  With a black gel liner and a pointed eyeliner brush, draw a fairly thick black line all around the eye, using the line you created with the tape as a guide line.  The liner under the outer corner of your eye will be thickest, as this is where you're changing the shape.  Point the liner at the inner corner too.

9.  Run the purple shadow under the eye.  Use a black shadow to blend the black liner down into the purple.  Apply black pencil liner to the upper and lower waterline.

10.  Add mascara and some nice big lashes!

Thursday, 9 January 2014

White crease FOTD

I decided to try something a little new today, and place white in the crease area where I would usually place a contrasting or darker colour.  I placed the green above it, as I would usually place the transition colour, because otherwise it would have been a little boring!  I don't think it turned out too badly, although it was a little strange to not add anything to the outer V.  

I've also found out that NYX Jumbo Pencil in Milk works way better on the waterline than Urban Decay's Yeyo!

Also, I know that the false lashes don't look amazing, I didn't use mascara to bind them to my lashes.  Bit of a 'duh' moment for me!


Products Used

NARS Smudge Proof Eyeshadow Base
NYX Jumbo Pencil in Milk
Sugarpill Tako eyeshadow
Sleek Acid palette
Urban Decay 24/7 pencil in Junkie
Lancome Hypnose Star mascara
Active Cosmetics lashes that I chopped up to make half lashes.

Wednesday, 8 January 2014

Quick look using Naked 3

I'm still loving this palette!  Kept the look a little softer by using brown pencil liner instead of my usual black liquid or gel.  My skin is almost back to normal again, so hopefully I'll be able to ditch the foundation soon.


Products Used

Face
Illamasqua Skin Base Foundation - mix of shades 02 and 06
Illamasqua Skin Base Lift in Light and White 1
MAC Mineralize Skin Finish Natural in Light
Illamasqua Naked Rose blush
Guerlain Crazy Meteorites Radiance Powder

Eyes
Nars Smudge Proof Eyeshadow Base
Urban Decay Naked 3 palette (Dust, Buzz, Factory, and Blackheart)
Boots Natural Collection Yogurt eyeshadow
Urban Decay 24/7 pencil in Demolition
Lancome Hypnose Star mascara
Active Cosmetics lashes

Lips
Benefit Dandelion Gloss

Tuesday, 7 January 2014

Re-doing paranormal FOTD

This was a look I did a while back that I really love.  Since my photography skills have improved a little since I last posted it, I thought I'd put some clearer ones up.  I was pretty lazy with my false lashes, so apologies for them looking so sloppy!  I paired this look with Benefit Sugarbomb blush, and Guerlain Madame Fascine lip gloss.


Products Used 

NARS Smudge Proof Eyeshadow Base
Beauty UK Double ended shadow pencil - black and white (white end used as base)
Illamasqua Paranormal palette
MAC eyeshadows in Nylon, Goldmine, and Contrast
Illamasqua pencil in Vow
Urban Decay 24/7 pencil in Goldmine
Illamasqua black gel eyeliner
Lancome Hypnose Star mascara
Active Cosmetics false lashes
MUFE Aqua Brow


Monday, 6 January 2014

Frosty blue FOTD

I've been seriously neglecting my MAC palettes recently, and as I'm on a makeup buying ban, I figured I should try to use some shadows that I haven't used in a long time.  I opted for a blue/green look.  The shadows from MAC's Cool Heat collection are such great colours.  I also patted Illamasqua's pigment in Beguile on top of the lid colour, but I couldn't get the sparkle to show up in pictures.


Products Used

NARS Sumdge Proof Eyeshadow Base
Beauty Uk Shadow and Liner Duo - black and white (white as base)
MAC Mutiny pigment
MAC eyeshadows in Warm Chill, Gulf Stream, Humid, Nehru, and White Frost
Illamasqua Beguile pigment
Urban Decay 24/7 pencil in Invasion
Avon Colour Trend light blue pencil
Lancome Hypnose Star mascara
Active Cosmetics lashes (cut to use as half falsie)
MUFE Aqua Brow

Sunday, 5 January 2014

Bright and bold FOTD

I fancied doing something a little different today.  This was another one of those looks where I had no idea where it was going when I first started it.  I'm not totally in love with this look, and it definitely could have been tidier.  Ah well.


Products Used

NARS Smudgeproof Eyeshadow Base
NYX Jumbo Pencil in Milk
Urban Decay 24/7 pencils in Zero, Woodstock, and Psychedelic Sister
Sugarpill Burning Heart palette (Buttercupcake, Love+, and Poison Plum)
Sugarpill Sweetheart palette (Tako) 
Illamasqua Precision Ink in Scribe
Rimmel Glam Eyes Liquid Liner in Black
Lancome Hypnose Star mascara
Active Cosmetics lashes
MUFE Aqua Brow

Saturday, 4 January 2014

A purple look tutorial

It's really simple to switch up the colours in this look, as there's only 3 eyeshadows used!  Just swap the dark and light purple for dark and light hues of the colour of your choice!


Products Used
Nars Smudge Proof Eyeshadow Base
NYX Jumbo Pencil in Milk
Sugarpill Tako eyeshadow
Sleek Saturn's Ring eyeshadow (Celestial palette)
MAC Beauty Marked eyeshadow
Rimmel Glam Eyes black liquid liner
Urban Decay 24/7 pencil in LSD
Lancome Hypnose Star mascara
Active Cosmetics lashes


I started by priming my eye with an eyeshadow base and NYX Jumbo pencil in Milk.  

1.  Pat a matte white eyeshadow onto the inner half of your lid.
2.  Apply a light purple shadow in the crease, winging it out slightly at the end. 
3.  Pat the same light purple onto the outer half of the lid, blending into the white.
4.  Highlight the brow bone with white shadow, and blend the purple, softening the line, adding more definition to the wing.
5.  Outline the crease and outer v with a dark purple shadow.  This is where you can really define that wing shape.
6.  Gently blend into the light purple.
7.  Apply both purples to the lower lash line, running the light purple all the way along, and then placing the dark purple on top, just over the outer third.
8.  Line your upper lash line with black liquid liner.
9.  Use a medium blue pencil to line your waterline.
10.  Add mascara, and, if you desire, false lashes.

Friday, 3 January 2014

A rather summery FOTD

Given the awful weather here, I felt like lifting my mood by creating this summery look.  I also got to use the Amarni Lip Maestro that I received for Christmas. It was only once I finished doing my makeup that I realised that it's very reminiscent of MAC's Barbie collection from years ago.  My skin has been really awful since I got back from France, so I've had to start wearing foundation again. 


Products Used

Face
Illamasqua Skin Base Foundation - a mixture of shades 02 and 06
Illamasqua Skin Base Lift in White and Light 1
MAC Mineralize Skin Finish Natural in Light
MAC Pink Swoon blush

Eyes
NARS Smudge Proof Eyeshadow Base
NYX Jumbo Eye Pencil in Milk
Sleek Celestial palette (green and dark blue)
Sleek Oh So Special palette (pink)
Sleek Vintage Romance palette (purple)
Boots Natural Collection eyeshadow in Yogurt
Illamasqua black gel liner
Urban Decay 24/7 pencil in Deep End
Lancome Hypnose Star mascara
MUFE Aqua Brow

Lips
Armani Lip Maestro shade 505

Thursday, 2 January 2014

My red lipstick collection

I've put myself on a makeup buying ban for a couple of months, focusing on using what I already have.  I thought this would be a good opportunity to share with you the things I already have in my stash.  It'll also help me see what my collection is missing.  This post will be on red lipsticks.

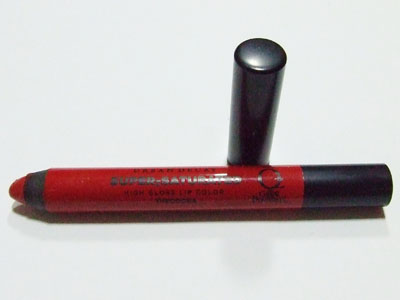
Urban Decay Super Saturated High Gloss Lip Colour in Theodora
This lip pencil came in the limited edition Theodora palette.  It's a  true cherry red, which has very subtle shimmer.  As it's a very neutral red, it's one that will work on most skin tones.  It applies opaquely, and, as the name suggests, with a glossy finish.  It's really comfortable and moisturising to wear, however the slippy formula means that it is prone to smudging.


Guerlain Rouge G in Garconne
This is one of my all time favourite lipsticks.  Garconne is a bright, blue toned red, that looks great against cooler skin tones.  It applies smoothly, and opaquely, with a beautiful cream finish.  It's really comfortable to wear, and staying power is great.


Guerlain Rouge G L'Extrait in Colire
This lipstick was my first liquid lipstick, and it was definitely a good choice!  Colire is a bright red with slight coral undertones.  Another opaque lipstick, this dries down to a comfortable modern matte finish.  Staying power is great, and if I need a red lipstick that's going to stick around all day, this is the one I reach for. 


Dior Diorific lipstick in Diorling 
Another blue toned cherry red, Diorling is a little darker than Garconne.  Opaque with a cream finish, this is another comfortable lipstick to wear, that has good staying power.


NYX Jumbo Lip Pencil in Vixen
A deep red with brown undertones, this lipstick was part of my 'prefect dark red lipstick' series.  I love the colour, but the slippery formula didn't win any points from me.  Read the full review here.


Chanel Rouge Allure in Rouge Noir
Another from 'the perfect dark red lipstick' search, Rouge Noir is the closest I've come to finding 'the one'.  A brown toned dark red, this lipstick isn't as scary on as it looks in the tube.  Find my full review here.


Obsessive Compulsive Cosmetics Lip Tar in Black Dahlia
Another dark red, this one leans more purple than brown.  Opacity is buildable, and staying power is good.  For the full review, click here.


From left to right: Urban Decay Theodora, Guerlain Garconne, Guerlain Colire, Dior Diorling, NYX Vixen, Chanel Rouge Noir, OCC Black Dahlia.

I think what I'm missing is a sheerer, more subtle red!  What's your favourite red lipstick?