Monday 30 September 2013

NOTD - Glittery french tips

Just a quick nail post from me today!  I've really been loving french tips with a twist.  It something even I can't mess up! 

I used OPI's Vampsterdam as a base, and then Barry M's Magenta Glitter for the tips.  


Sunday 29 September 2013

Sleek Vintage Romance and MAC Plum Dandy review, and 3 FOTDs!

After seeing pictures of Sleek's new palette, Vintage Romance, I knew I just had to have it.  It wasn't long before I found my way to Superdrug to check it out in person.  I walked away with just the palette, telling myself that I was going to be good and buy the blush another week.  I lasted all of one day before I headed back to pick up the blush!


The palette is a mix of shimmery silvers and bronzes, along with vibrant purples, and deep shades of blue, purple and black.


The shadows are exactly as you would expect from Sleek; soft, pigmented, and easy to blend.  I was a little concerned that the top blue shade (Romance in Rome) was a rather sheer, but once on the lid it was easily buildable.  The only problem I had was that the shimmer in some shades had a tendency to disappear when blended.  This was easily solved by patting a little more shadow on top once you had blended it out.  The silver glitter in the black shadow didn't really translate to the lid either.

This is a great palette, and is probably my favourite Sleek palette so far.  It's a really versatile palette, so it's one you can reach for time and time again, and not get bored of.  

Keep reading for some of the different looks I've done using it!

When I saw the blush, Antique, on the website, I didn't really take much notice of it.  Whilst I love a good blush, they're probably the product I most often skim over when faced with a new collections.  I swatched it on my hand when I picked up the palette, but didn't buy it.  As I left the shop, I kept looking at the swatch, and the more I looked at it, the more I wanted it!


Antique is described as a dusty rose.  It's a pink toned brown with silver shimmer.  In the palette it looks like quite a deep colour, which for someone with skin as pale as mine can be a little daunting.  The blush is soft, and it's easy to apply a sheer wash of colour.  If you're looking for a a deeper colour it's possible to build the colour up.
Blended and un-blended

The shimmer shows up more in the swatches than it does on cheeks, just giving you a soft glow.  Whilst some shimmery blushes can emphasize pores, I didn't have this problem.  It's a great neutral fall colour, which I imagine will look great on both light and dark skin tones.

On my shopping trip I also made a trip to the MAC counter.  I don't buy a lot of MAC these days, but my Mineralize Skin Finish is running low.  I really must do a review on this, because I always get compliments on my skin when I wear it!  A couple of months ago, I replaced all the foundations in my kit, so was left with some MAC empties that I could trade in.  MAC lipsticks aren't my top choice, as I find that they dry out my lips.  But I could never pass up a free lipstick!


After swatching a dozen or so lipsticks, I finally settled on Plum Dandy.  It's a frost finish, which, back when I was a avid MAC lipstick collector, I used to avoid, as they show up any imperfections and dryness on your lips.  These days I'm pretty OCD about not having dry or chapped lips, so it's not so much of a problem.  And my collection is definitely lacking frost finishes!


Plum Dandy is, as you might suspect, plum in colour.  The base colour is pretty similar to my natural lip colour, adding a subtle pink-plum tinge.  What makes Plum Dandy so beautiful is the gold/bronze shimmer running through it.  In dull light, the lipstick takes on a deeper colour, looking like a mid-tone brown-plum.  In sunlight, it really comes alive, and you can see the true plum colour, with lots of fine shimmer.  I tried to capture it on camera, but it was so hard, especially as there's pretty much no sunlight at the moment! 


I love the colour, but I'm still not sold on the formula.  The lipstick has fairly good staying power, and isn't as drying  as some MAC frosts can be, but it's not the most comfortable lipstick.  After a couple of hours I do find myself topping it with a lip gloss, and when you do that you lose the stunning shimmery effect.  I'm sure I'll use it again, but it won't be my go-to lip colour.  If you get along with MAC's formula I'd definitely recommend checking it out, as it's one of the prettiest colours they do!

Here are some of the looks I've done using my new products!  You can see just how versatile the palette is.  The first look doesn't use the blush and lipstick, as it was before I bought them.  I couldn't wait until my return trip to try out the palette though!

Apologies for some of the poor quality photos.  I use natural light when taking pictures, and I'm starting to struggle now that the winter is drawing near.  I'll get a day light bulb sorted soon!
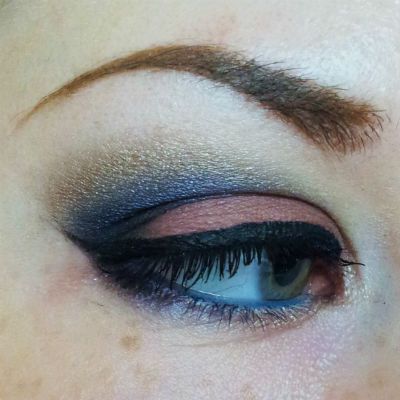
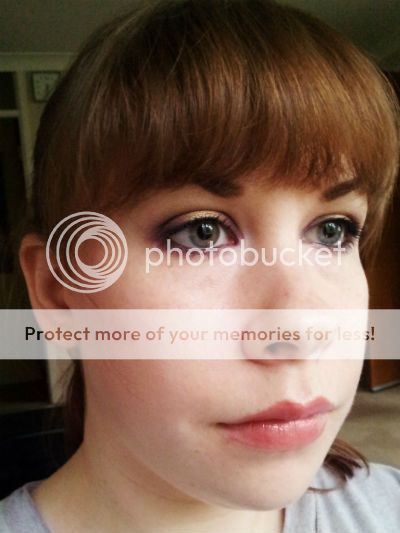

Look 1


Products Used

Face
Illamasqua Skin Base Lift (White and Light 1)
MAC Mineralize Skin Finish Natural (Light)
MAC Mineralize Skin Finish (Porcelain Pink)

Eyes
Too Faced Shadow Insurance
Sleek Vintage Romance palette (Lust in LA, Romance in Rome, Propose in Prague, Love in London)
Boots Natural Collection eyeshadow in Sea Shell
Illamasqua black gel liner
Urban Decay 24/7 liner Abyss
Benefit They're Real mascara

Lips
Armani Lip Maestro shade 500
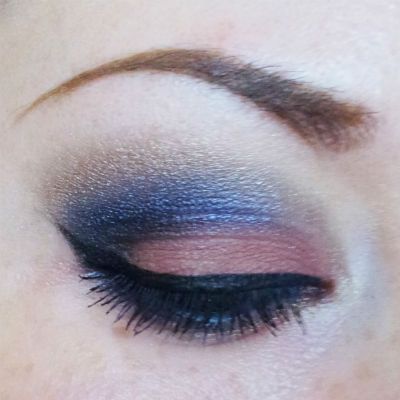

Look 2


Products Used

Face
Illamasqua Skin Base Lift (White and Light 1)
MAC Mineralize Skin Finish Natural (Light)
Sleek blush in Antique

Eyes
Too Faced Shadow Insurance
Sugarpill Afterparty eyeshadow (brows)
Sugarpill Tako eyeshadow
Sleek Vintage Romance palette (Pretty in Paris, Vow in Venice, Marry in Monte Carlo, Honeymoon in Hollywood, Forever in Florence)
Illamasqua black gel liner
Illamasqua Sophie pencil liner
L'Oreal Volume Millions Lashes Purple

Lips
MAC Plum Dandy lipstick
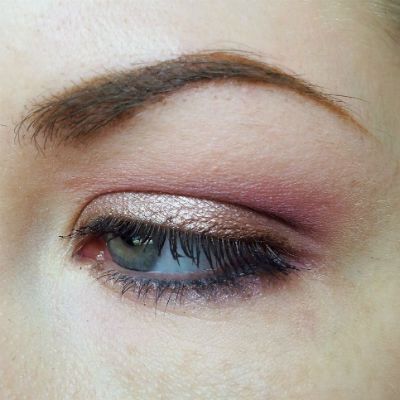

Look 3


Products Used 

Face
Illamasqua Skin Base Lift (White and Light 1)
MAC Mineralize Skin Finish Natural (Light)
Illamasqua Velvet Blush in Peaked

Eyes
Too Faced Shadow Insurance
Sleek Vintage Romance palette (Pretty in Paris, Court in Cannes, Propose in Prague, Forever in Florence)
Boots Naturals Eyeshadow in Sea Shell
Urban Decay 24/7 pencils in Underground and Desperation
L'Oreal Volume Million Lashes Purple

Lips
YSL Rouge Volupte Shade 09

Saturday 28 September 2013

NOTD - Illamasqua Viridian

Just a quick post from me.  I'm in the process of reviewing a couple of new makeup purchases, so there will be a decent post up tomorrow!

For now, I thought I'd share with you what I'm wearing on my nails.  There's pretty much no natural light at the moment, so the picture really doesn't do it justice!

Illamasqua's Viridian is a deep shimmery green.  I purchased it in one of their Christmas gift sets last year, and while the colour is quite a Christmas-y green, I think it's great for fall too.  I've french tipped mine, using Essie's matte top coat for the main part of the nail, leaving just the tips shiny.  It's quite a subtle effect, but I like it!


Thursday 26 September 2013

Rainbow Tutorial

Here's a brightly coloured rainbow look, using Sugarpill eyeshadows.  I forgot to take a picture of the step in between the pictures numbered 7 and 8.  All you need to do is blend the blue shadow up into the crease colours.  Hope you like it!

Products
Too Faced Shadow Insurance
Urban Decay Abyss 24/7 pencil liner
Sugarpill Burning Heart palette
Sugarpill Sweetheart palette
Illamasqua black gel liner
Illamasqua Sophie pencil
Benefit They're Real mascara
Active Cosmetics Beauty lashes


1.  After applying your primer, use a blue pencil liner (Abyss) and draw where you plan on winging your eyeliner too.  I usually draw the line from the corner of my eye, towards the end of my eyebrow.  Mark the crease with the liner too.

2.  Apply a pink shadow (Dollipop) to the inner third of the lid.

3.  Then, blending into the pink, apply a purple shadow (Poison Plum) to the middle of the lid.

4.  Apply a blue shadow (Afterparty) to the outer third.  Using a thin, angled brush, apply the shadow on top of the crease line too.

5.  Still using the blue shadow, take the colour up towards the brow bone on the outer third of the crease.

6.  Apply a green shadow (Midori) to the middle of the crease.

7.  Taking the yellow shadow (Buttercupcake), place the colour along the inner third of the crease.  Blend the blue shadow up and into the crease colours (not pictured).

8.  Highlight under the brow bone using a white shadow (Tako) and blend towards the crease.

9.  Apply the pink along the inner third of the lower lash line.

10.  Along the outer third of the lash line, place the blue shadow.

11.  Use the green shadow to fill in the center space along the lower lash line.

12.  Line the upper lash line using a black gel liner.  Follow the line you drew with the blue pencil in step one.

13.  Use a black pencil (Sophie) to line your upper and lower waterlines.

14.  Apply mascara.

15.  Add false lashes.

16.  And you're done!

Here's how I wore the look.


Products Used

Face
YSL Touce Eclat foundation
Illamasqua Skin Base Lift
MAC Mineralize Skin Finish Natural
Benefit Dandelion Blush

Eyes
See above

Lips
Burberry Sweet Pea Lip Glow

Wednesday 25 September 2013

Another Urban Decay FOTD

As I've been staying over at my boyfriend's house, the makeup I have on hand is fairly limited.  This time I brought the two Wizard of Oz Urban Decay palettes with me.  The past two looks have been using the palettes individually.  In this look, I used colours from both palettes.  As much as I love the silver from the Glinda palette, the gold is a nightmare.  Fall out city.  I was picking glitter off my cheeks and lips all day.  And the gold from the Theodora palette is even worse!  Must find a nicer gold shadow.


Products Used

Face
Illamasqu Skin Base Lift (White and Light 1)
MAC Mineralize Skin Finish Natural (Light)
MAC Pet Me Mineralize blush

Eyes
Too Faced Shadow Insurance
Urban Decay Glinda palette (Tornado and Oz)
Urban Decay Theodora palette (Broken and Beware)
Illamasqua Sophie pencil
Benefit They're Real mascara
MUFE Aqua Brow

Lips
Dior Addict Lipstick No.445

Tuesday 24 September 2013

Glinda FOTD

A quick look I did using Urban Decay's Glinda palette.  I always forget what a beautiful silver Oz is!


Products Used

Too Faced Shadow Insurance
Urban Decay Glinda palette (Oz, Tornado, Magic, and Aura eyeshadows, and Rockstar 24/7 eyeliner)
Illamasqua Sophie pencil
Illamasqua black gel liner
Benefit They're Real mascara

Sunday 22 September 2013

On set FOTD

Yesterday I was doing hair and makeup for a video shoot for Rip Curl, and I took a couple of shots of the makeup that I was wearing.  I tend to stick to fairly simple makeup as the last thing I want to do before a long day is have to get up even earlier! I mainly focus on making my skin look better, as I never know when photographers are going to want to take behind the scenes shots of me doing makeup. When I know I'm gonna be on set all day, the most important thing about my makeup is that it lasts the day without needing touch ups.  It certainly did last all day, with only a quick powder about 6 hours in to get rid of some oiliness.


Products Used

Face
Urban Decay De-Slick in a Tube
Illamasqua Skin Base Foundation
Illamasqua Skin Base Lift concealer
MAC Mineralize Skin Finish Natural
Benefit Dandelion blush
MAC Mineralize Skin Finish in Lightscapade

Eyes
Too Faced Shadow Insurance
Maybelline Colour Tattoo Cream Shadow in Totally Taupe
Illamasqua Slink eyeshadow
Boots Natural Collection eyeshadow in Sea Shell
Urban Decay 24/7 pencil in Uzi
Illamasqua Sophie pencil liner
L'Oreal Volume Million Lashes purple

Lips
Guerlain Rouge G L'Extrait lip colour in Gourmandise


And here's a couple of shots from the shoot!


Friday 20 September 2013

The search for the perfect dark red lipstick - OCC Black Dahlia

With days getting darker and gloomier, my desire for that perfect dark red lip grows.  Next up on my list to try is Obsessive Compulsive Cosmetics' Lip Tarr in Black Dahlia.  I've been eyeing this up for a while now, along with a couple of other colours.  For whatever reason, I've not tried Lip Tarrs before, and to be honest I was kind of nervous about trying them, as I'd heard that they can be a little tricky to apply.


Luckily I had nothing to worry about, and I didn't struggle with application at all.  The lip brush that came with it was pretty much un-usable, as the brush hairs were covered in dried on glue.  This didn't really bother me that much as I would have probably used my own lip brush anyway (I use Real Technique's Detailer Brush).  You only need a tiny amount at a time, but so long as you build the colour up gradually, there are no problems with applying it.  In fact, this gives you greater control over the colour you achieve.  Below are three pictures, starting with just one sheer layer, then two coats, then, finally three coats.

1 coat, applied as more of a stain

2 coats

3 coats
As you can see, as scarily dark as Black Dahlia looks in the tube, it can easily be made more wearable by being worn as more of a stain.  It's a dark purple-toned red, which can either be a berry stain, or a vampy dark red, with a slightly glossy finish.

Staying power is great as a stain, but I found that once I built up to three coats, the darkest colour, it didn't properly dry down.  It did however fade evenly, and after about 4 hours had worn down to the stain you see in the first picture.

The formula wasn't drying, but you'll want to make sure you exfoliate and moisturise your lips before you apply.  As with most dark colours, it looks better if you use a lip liner.

So is this the red I've been looking for?  Not quite.  It's a little too purple for what I'm looking for.  But is this a great fall lip colour that I'll be reaching for again?  Most definitely!