Showing posts with label Sugarpill. Show all posts

Wednesday, 25 June 2014

Choosing my eyeshadow using a random number generator!

At times I feel totally uninspired as to what to do with my makeup.  To help keep the creative juices flowing I decided to number all of my eyeshadows and then use a random number generator to chose 3 eyeshadows that I then have to use in a look.  Today's random picks, Flamepoint, Smashing Pots, and the light pink from Sleek's Sunset palette, went really well together.  I decided to pat Cake on top of Flamepoint to tone it down a touch.  The look ended up looking like one I did a while back, but I'm still pretty happy with it.


Face
Benefit Big Easy Light
Benefit Boi-ing Shade 1
Illamasqua Skin Base Lift concealer White and Light 1
Urban Decay Ultra Definition Loose Finishing Powder Light
Shiro Hearts eyeshadow (as blush)

Eyes
Nars Smudge Proof Eyeshadow Base
NYX Jumbo Pencil in Milk
Sleek Sunset palette (pink)
Sugarpill Flamepoint eyeshadow
Shiro eyeshadows in Smashing Pots, War of Five Armies, and Cake
Rimmel Glam Eyes black liquid liner
Urban Decay 24/7 pencil in Chaos
Lancome Hypnose Star mascara
MUFE Aqua Brows

Lips
Shiro Shoop-Da-Whoop intertube

Wednesday, 28 May 2014

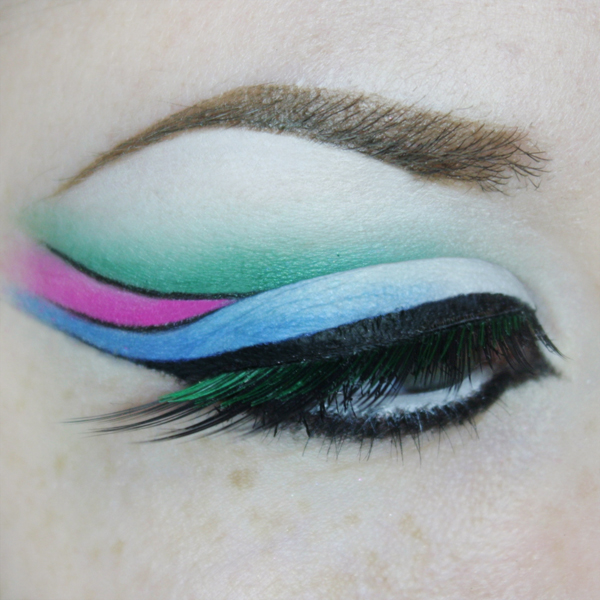
Rainbow eyes FOTD

I was really feeling the need for colour, and this look certainly scratched that itch!  It was inspired by a look Sugarpill re-posted on Instagram from kawaiiichigoo.


Eyes
NARS Smudge Proof Eyeshadow Primer
NYX Jumbo Pencil in Milk
Sugarpill  eyeshadows in Tako, Buttercupcake, Velocity, Dollipop, and Poison Plum
MAC Gulf Stream eyeshadow
Rimmel Glam Eyes black liquid liner
Lancome Hypnose Star mascara
Active Cosmetics lashes
MUFE Aqua Brow

Lips
Revlon Just Bitten stain in Lovesick
Shiro opaque custom gloss in Moon Prism Power

Monday, 14 April 2014

Quick summery FOTD

I've got a super busy week ahead of me, and I'm not sure whether I'm going to have time to photograph my makeup in the morning before I head out, so this might be the last look I post for a few days.


Face
YSL Touche Eclat foundation BR10
Illamasqua Skin Base Lift White and Light 1
MAC Mineralize Skin Finish Natural Light
Illamasqua powder blush in Rumor
Illamasqua cream blush in Promise
Benefit Dandelion blush
Barbara Daley highlight powder

Eyes
Maybelline Colour Tattoo in Tough as Taupe
Sugarpill eyeshadows in Tako and Buttercupcake
Collection 2000 Extreme 24 Hour Felt Tip Liner in Teal
Urban Decay 24/7 pencil in Electric
Lancome Hypnose Star mascara
MUFE Aqua Brow

Lips
Revlon Just Bitten Kissable Balm Stain in Lovesick
Burberry Pink Sweetpea lipgloss

Thursday, 13 March 2014

Sweetheart FOTD

Just a quick look I did yesterday.  It was nice to do something bold again.  I think my gel liner is coming to the end of it's life though, it's getting hard to draw a smooth line.  It's lasted longer than the Bobbi Brown gel liner I had before though.  That dried out super quick!  Think I'll probably be re-buying the Illamasqua liner.


Products Used

NARS smudge proof eyeshadow base
NYX jumbo pencil in Milk
Sugarpill Sweetheart palette
Illamasqua gel liner in Infinity
Lancome Hypnose Star mascara
Illamasqua false lashes
MUFE Aqua Brow

Friday, 31 January 2014

Aries FOTD

I was excited to do the Aries face chart in the Sephora star signs collection, as this is a look I used to love to wear.  Again, I followed the picture more than the instructions which would give you a more toned down version of the look I've done.

You may also notice that I'm back to using my YSL Touche Eclat foundation.  The Maybelline BB cream I was trying out had a tendency to oxidize and turn orange after a couple of hours of wear.  Those with more neutral or yellow tones in their skin probably wouldn't notice, but I didn't love it on my cool toned, pale skin.  Which is a shame, because aside from that it's actually a pretty nice BB cream for oily skin.


Face
Maybelline Baby Skin primer
YSL Touche Eclat foundation in BR10
Illamasqua Skin Base Lift in White and Light 1
MAC Mineralize Skin Finish Natural in Light
MAC Sculpt powder
Illamasqua Rumour blush
Benefit Dandelion blush
MAC Mineralize Skin Finish in Lightscapade

Eyes
NARS Smudge Proof Eyeshadow Base
Beauty UK Black and White double ended pencil
Urban Decay eyesahdow in Blackout
MAC eyeshadows in Warm Chill and Cool Heat
Sugarpill eyeshadows in Afterparty and Tako
Illamasqua gel liner in Infinity
Illamasqua Sophie pencil
Lancome Hypnose Star mascara
Girls With Attitude Diva lashes

Lips
Benefit lipstick in Juicy Details

Thursday, 9 January 2014

White crease FOTD

I decided to try something a little new today, and place white in the crease area where I would usually place a contrasting or darker colour.  I placed the green above it, as I would usually place the transition colour, because otherwise it would have been a little boring!  I don't think it turned out too badly, although it was a little strange to not add anything to the outer V.  

I've also found out that NYX Jumbo Pencil in Milk works way better on the waterline than Urban Decay's Yeyo!

Also, I know that the false lashes don't look amazing, I didn't use mascara to bind them to my lashes.  Bit of a 'duh' moment for me!


Products Used

NARS Smudge Proof Eyeshadow Base
NYX Jumbo Pencil in Milk
Sugarpill Tako eyeshadow
Sleek Acid palette
Urban Decay 24/7 pencil in Junkie
Lancome Hypnose Star mascara
Active Cosmetics lashes that I chopped up to make half lashes.

Sunday, 5 January 2014

Bright and bold FOTD

I fancied doing something a little different today.  This was another one of those looks where I had no idea where it was going when I first started it.  I'm not totally in love with this look, and it definitely could have been tidier.  Ah well.


Products Used

NARS Smudgeproof Eyeshadow Base
NYX Jumbo Pencil in Milk
Urban Decay 24/7 pencils in Zero, Woodstock, and Psychedelic Sister
Sugarpill Burning Heart palette (Buttercupcake, Love+, and Poison Plum)
Sugarpill Sweetheart palette (Tako
Illamasqua Precision Ink in Scribe
Rimmel Glam Eyes Liquid Liner in Black
Lancome Hypnose Star mascara
Active Cosmetics lashes
MUFE Aqua Brow

Saturday, 4 January 2014

A purple look tutorial

It's really simple to switch up the colours in this look, as there's only 3 eyeshadows used!  Just swap the dark and light purple for dark and light hues of the colour of your choice!


Products Used
Nars Smudge Proof Eyeshadow Base
NYX Jumbo Pencil in Milk
Sugarpill Tako eyeshadow
Sleek Saturn's Ring eyeshadow (Celestial palette)
MAC Beauty Marked eyeshadow
Rimmel Glam Eyes black liquid liner
Urban Decay 24/7 pencil in LSD
Lancome Hypnose Star mascara
Active Cosmetics lashes


I started by priming my eye with an eyeshadow base and NYX Jumbo pencil in Milk.  

1.  Pat a matte white eyeshadow onto the inner half of your lid.
2.  Apply a light purple shadow in the crease, winging it out slightly at the end. 
3.  Pat the same light purple onto the outer half of the lid, blending into the white.
4.  Highlight the brow bone with white shadow, and blend the purple, softening the line, adding more definition to the wing.
5.  Outline the crease and outer v with a dark purple shadow.  This is where you can really define that wing shape.
6.  Gently blend into the light purple.
7.  Apply both purples to the lower lash line, running the light purple all the way along, and then placing the dark purple on top, just over the outer third.
8.  Line your upper lash line with black liquid liner.
9.  Use a medium blue pencil to line your waterline.
10.  Add mascara, and, if you desire, false lashes.

Sunday, 27 October 2013

Paperself Lashes FOTD

I picked up some Bourjois Paperself lashes from Boots for £1. 


I thought they'd look good with quite a simple eyeshadow design, so I decided to copy this look from Illamasqua.


The lashes are a little over the top for every day use, so I didn't wear them out, but they'd be great for a photoshoot!


Products Used

Too Faced Shadow Insurance
Sugarpill Sweetheart palette (Tako, Dollipop, and Afterparty)
Illamasqua black gel liner
Urban Decay Yeyo 24/7 eyeliner
Lancome mascara
Bourjois Paperself Couture lashes

Sunday, 6 October 2013

Candy Yum Yum FOTD

I'm still in the mood for bold makeup, but this time I went for brights.  Sugarpill and Sleek had me covered as far as eyeshadows were concerned, and I opted for one of my few MAC lipsticks, Candy Yum Yum.  It's an obnoxiously bright neon pink, and I've not got anything else in my collection like it.  My camera couldn't quite pick up just how bright it is!  I had to pop a gloss on top to keep my lips happy though.  I'm thinking about picking up OCC's Nylon Lip Tar, as it's a similar shade.  The eye makeup was inspired by one of the looks I posted in my last Inspiration post.


Products Used

Face
Illamasqua Skin Base Lift (White and Light 1)
MAC Mineralize Skin Finish Natural (Light)
MAC Azalea Blossom blush

Eyes
Too Faced Shadow Insurnace
Sugarpill Burning Heart palette (Buttercupcake, Poison Plum)
Sugarpill Sweet Heart palette (Tako, Afterparty)
Sleek Circus palette (dark purple and pink-red)
Urban Decay 24/7 eyeliner in Electric
L'Oreal Volume Million Lashes Purple
MUFE Aqua Brow

Lips
MAC Candy Yum Yum lipstick
Lancome Juicy Tube in Fraise

Thursday, 26 September 2013

Rainbow Tutorial

Here's a brightly coloured rainbow look, using Sugarpill eyeshadows.  I forgot to take a picture of the step in between the pictures numbered 7 and 8.  All you need to do is blend the blue shadow up into the crease colours.  Hope you like it!

Products
Too Faced Shadow Insurance
Urban Decay Abyss 24/7 pencil liner
Sugarpill Burning Heart palette
Sugarpill Sweetheart palette
Illamasqua black gel liner
Illamasqua Sophie pencil
Benefit They're Real mascara
Active Cosmetics Beauty lashes


1.  After applying your primer, use a blue pencil liner (Abyss) and draw where you plan on winging your eyeliner too.  I usually draw the line from the corner of my eye, towards the end of my eyebrow.  Mark the crease with the liner too.

2.  Apply a pink shadow (Dollipop) to the inner third of the lid.

3.  Then, blending into the pink, apply a purple shadow (Poison Plum) to the middle of the lid.

4.  Apply a blue shadow (Afterparty) to the outer third.  Using a thin, angled brush, apply the shadow on top of the crease line too.

5.  Still using the blue shadow, take the colour up towards the brow bone on the outer third of the crease.

6.  Apply a green shadow (Midori) to the middle of the crease.

7.  Taking the yellow shadow (Buttercupcake), place the colour along the inner third of the crease.  Blend the blue shadow up and into the crease colours (not pictured).

8.  Highlight under the brow bone using a white shadow (Tako) and blend towards the crease.

9.  Apply the pink along the inner third of the lower lash line.

10.  Along the outer third of the lash line, place the blue shadow.

11.  Use the green shadow to fill in the center space along the lower lash line.

12.  Line the upper lash line using a black gel liner.  Follow the line you drew with the blue pencil in step one.

13.  Use a black pencil (Sophie) to line your upper and lower waterlines.

14.  Apply mascara.

15.  Add false lashes.

16.  And you're done!

Here's how I wore the look.


Products Used

Face
YSL Touce Eclat foundation
Illamasqua Skin Base Lift
MAC Mineralize Skin Finish Natural
Benefit Dandelion Blush

Eyes
See above

Lips
Burberry Sweet Pea Lip Glow

Wednesday, 18 September 2013

Goblin Market Shoot

As I'm feeling a little under the weather at the moment, I thought I'd share with you a couple of images from my latest shoot.  It was inspired by Christina Rossetti's poem, Goblin Market.  I'm not gonna list the full list of products used, but the base was Illamasqua Skin Base foundation, and the eyes are mostly Sugarpill and Sleek eyeshadows.  


Saturday, 7 September 2013

Midori FOTD

Sometimes all it takes to make a simple look more dramatic is some bold eyeliner and false lashes.


Products Used
Too Faced Shadow Insurance
Sugarpill Sweetheart palette (Tako and Midori)
MAC Humid eyeshadow
Urban Decay Blackout eyeshadow
Rimmel Glam Eyes liquid liner
Lancome Virtouse mascara
Active Cosmetics lashes


Friday, 6 September 2013

Burning Heart FOTD

Just a quick look I did today.  Again, no full face shots cos my skin is still hating me.  It's slowly getting better though!  I should really use Sugarpill's Burning Heart palette more often.  I toned it down and made it a little more wearable for every day life by adding a little brown in the outer v.  


Eyes
Too Faced Shadow Insurance
Sugarpill Burning Heart palette
Illamasqua powder eyeshadow in Slink
Urban Decay powder eyeshadow in West (from the Theadora palette)
Urban Decay 24/7 pencils in Scorch and  Demolition
Rimmel Glam Eyes Black liquid eyeliner
Benefit They're Real mascaara
Active Cosmetics false eyelashes in Allure

Wednesday, 21 August 2013

Bright eyed and bright lipped FOTD and tutorial

I felt like doing something a little different today, so I pulled out my Sugarpill palettes, and did a bright cut crease look.  And then I added blue lipstick.  Just cos I could.  I did take pictures of it with a pink gloss, to make the look more wearable too.


Face
Lush Colour Suppiment in Jackie Oats
Illamasqua Skinbase Foundation in shade 02
MAC Mineralize Skin Finish Natural in Light
MAC Azalea Blossom Blush Ombre

Eyes
Too Faced Shadow Insurance
Sugarpill Burning Heart palette
Sugarpill Sweetheart palette
Urban Decay Blackout eyeshadow
Maybelline Colour Tattoo Cream Shadow in Eternal Silver
Bobbi Brown gel liner in Black
Illamasqua medium pencil in Sophie
Rimmel Glam Eyes Liquid Eyeliner
Benefit They're Real mascara


Lips - Blue
Illamasqua lipstick in Underworld on top of Illamasqua's Apocalips

Lips - Pink

Burberry Lipglow in Sweet Pea


1.  After applying your primer, use a synthetic flat shader brush to apply Maybelline Colour Tattoo shadow in Eternal Silver.
2.  With Bobbi Brown Gel Liner in Black, draw a line where your crease starts (when you close your eye, it's where you can feel your eyeball) with an eyeliner brush.
3.  Apply Buttercupcake to the inner most part of the crease using a tapered blending brush.
4.  Next to that, again using the tapered blending brush, apply Flamepoint, blending it into the yellow.
5.  Using the same method, apply Dollipop, blending it into Flamepoint.
6.  With the tapered blending brush, apply Poison Plum to the outer part of the crease.
7.  Take the flat shader brush and apply Blackout along the liner, blending it up into the colours.  Apply more of the bright colours if you need to.
8.  With a fluffy tapered brush, highlight under your brow with Tao, blending down into the colours.
9.  This is where you can tidy up if you need to.  I dusted away any fallout, and applied Eternal Silver where touch ups were needed.  I also took some makeup remover and made the outer area of the crease into a sharp line.  This helps you apply the eyeliner in the right place.
10.  Apply your black liquid liner along the upper lash line, winging it out and up.
11.  Apply Eternal Silver along the lower lash line.  Line both the upper and lower waterlines with black pencil eyeliner.
12.  Add mascara and you're done!